


Tips from the Wheel World
Recognizing that the best SCI advice often comes from other people living with SCI, we are collecting tips and ideas from peers who have figured out ways to make life with SCI a little easier, healthier or more enjoyable.
Do you have a tip you would like to share with the SCI community? Click here to submit your ideas.
Contents
-
Get a Grip:Wheelchair Handrims
-
Remote-Controlled Door Opener for your Home
-
Be more visible at night: Lighted casters and holographic spoke covers
-
A "Cushier" Shower Chair Cushion
-
Stay hydrated!
-
Shoes & Pressure Ulcers
-
Sugru: Modify/Adapt/Fix (Almost) Anything
-
Keeping Warm
Get a Grip: Wheelchair Handrims
Spring 2016
This tip comes from Elisa Smith, PT, DPT, NCS, who is a physical therapist at Harborview Medical Center and a member of our Consumer Advisory Board. Elisa works with people with SCI on Harborview Medical Center's inpatient acute rehabilitation unit.
Not all wheelchair handrims are the same, and the type of handrim you use can have a big impact on your comfort and pushing ability. Unlike years past, there are now several options available that you might want to consider.
As a physical therapist who works with SCI inpatients when ordering their first wheelchair, I have tried to become familiar with the options beyond the standard “out-of-the-box” round metal tubes. Since anything non-standard costs more, I wanted to see if the extra expense is worth it.
My research led me to wheelchair users, online forums, manufacturer representatives, other therapists and published studies.
The main variations in handrims have to do with shape and coating, both of which affect durability, weight and cost.
Shape
Standard rims are round tubes about an inch or less in diameter (see below, image on left). They are lightweight and “free” (i.e., not an additional charge on a wheelchair order) as long as they are aluminum and do not have any coating. The down side of the round shape is that it can force the wrist and hand into a bent position. Over time this can lead to carpel tunnel syndrome and the associated hand pain, tingling, numbness, and weakness—definitely something you want to avoid!
An alternative shape is the ergonomic ellipse (an elongated circle stretched into an oval—see image on right). “Ergonomic” in this case means it is a better fit that causes less strain. These rims are slightly larger and heavier than the round tube and cost between$300 and $400. Still,  almost every user I have asked says an ergonomic rim is far more comfortable to grasp and makes pushing easier.
Coating
Uncoated standard rims cause less friction; they rub less and do not leave black smudges on the skin. But less friction also makes it difficult for people with weak hands to get enough traction to press or grasp the rim.
People with a weak grasp usually need extra traction from a partially or fully coated rim, and a patterned or textured coating can add more traction than a smooth coating. Coating material also matters: rubber and neoprene are easier to grip than vinyl, and rubber is less slick when wet than both neoprene and vinyl. Vinyl is less durable; chips and tears in a damaged coating can scrape the hands and are expensive to fix. Saving $100 to $200 up front by buying vinyl may not be worth the lower durability or traction. All the coatings provide some insulation, making them more comfortable in extreme temperatures.
Knobs
Knobby rims—also known as “projection rims” or “quad knobs”— offer extra grasp for users with less hand function. They make me nervous, however, because the knobs can ram into the users’ palms when they coast down ramps and potentially cause injury. Likewise, I often see users wrench their thumbs on the projections. Based on my discussions with users and therapists, they are not worth the weight or price.
Gutters
Another design feature of rims is the “gutter,” also called the thumb piece, where the thumb rests between the wheel and the rim. This can be solid or flexible and low or high friction, depending on the material. This may help with grip and keeping your hands off the tire. They can add $150 to the price tag and are only available on certain rim products. Users with normal or almost normal hand strength and flexibility can benefit from the ergonomic thumb positioning support. But people with weak or tight hands often do not benefit because they cannot rest their thumbs on the gutter.
Weight
Therapists often worry that ordering expensive rims piles more weight onto a wheelchair, making it harder to push and load into a car. I compared most of the popular rims in my region, and found that all the rims, regardless of shape or coating, weigh between 1.5 and 3 pounds per pair. This is a negligible difference considering the total weight of the wheelchair (usually around 35 lbs.) and the user.
Try Them First!
Finally, test different handrims. Get a referral from your doctor to a wheelchair “Seating Clinic” where a therapist and wheelchair vendor can help you trial rim options and potentially ask your insurance to pay for them. Test them out on ramps, at slow and fast speeds, while dry and wet, and when braking and turning. As you trial rims, check for pain, discomfort, effort, push technique, and speed. This is the best way to help you narrow down your choices. Ultimately, you want the best performance based on your individual needs and financial constraints.
Good luck!
References
- Dieruf K, Ewer L, Boninger D.: The natural-fit handrim: factors related to improvement in symptoms and function in wheelchair users. J Spinal Cord Med, 2008, 31: 578–585
- Medola FO, Fortulan CA, Purquerio BM, et al.: A new design for an old concept of wheelchair pushrim. Disabil Rehabil Assist Technol, 2012, 7: 234–241
Perks BA, Mackintosh R, Stewart CP, et al.: A survey of marginal wheelchair users. J Rehabil Res Dev, 1994, 31: 297–302 - Richter WM, Rodriguez R, Woods KR, et al.: Reduced finger and wrist flexor activity during propulsion with a new flexible handrim. Arch Phys Med Rehabil, 2006, 87: 1643–1647
- van der Linden ML, Valent L, Veeger HE, et al. : The effect of wheelchair handrim tube diameter on propulsion efficiency and force application (tube diameter and efficiency in wheelchairs). IEEE Trans Rehabil Eng, 1996, 4: 123–132
- van der Woude LH, Formanoy M, de Groot S.: Hand rim configuration: effects on physical strain and technique in unimpaired subjects? Med Eng Phys, 2003, 25: 765–774
Remote-Controlled Door Opener for your Home
Fall 2015
This installment came from Lan Remme, who is a member of our SCI Consumer Advisory Board and has C6 complete tetraplegia.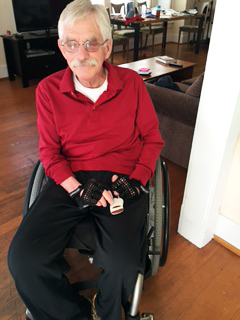
Installing a remote-controlled door opener in my front door proved to be the simplest, most practical accommodation I have added to my home since I began wheeling four years ago.
I contacted the company Open Sesame (www.opensesamedoor.com/) for a bid, expecting to hear I would have to pawn my wheelchair to afford one and live around installation and disruption for a few days.
To my pleasant surprise, the price was $2,000 and the installation time around two hours. The hardware was installed by Adaptive Installations (www.adaptiveinstallation.com/). They were efficient and polite while warning my wife Laura to keep an eye on me lest I start sneaking out of the house at night. They did return once for an adjustment.
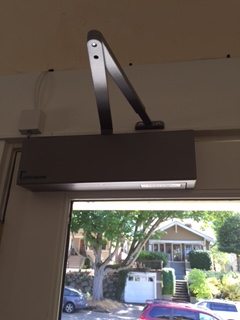
I open the door using a remote control that I keep on a lanyard for easy access. When I click the opener, the door swings wide and allows an ample ten seconds for me to exit or enter. The time it stays open can be adjusted.
The door opener operates whether the door is locked or unlocked.
Because of my limited dexterity, I used to experience substantial stress closing and locking my door behind me when exiting and again when manually unlocking the door for re-entry.
Sometimes I dropped my key and had to ask a neighbor or passerby to pick it up for me. I used rubber tubing to close the door behind me. Now I can preset the door handle lock and use the door opener to exit and close the door.
This definitely enhances my independence and makes life easier. And compared to other accommodations like ramps and lifts, the price is right and the installation simple.
Be more visible at night: Lighted casters and holographic spoke covers for your wheelchair
Spring 2015
Submitted online by Jessie Gray, a manual wheelchair user with L1-2 incomplete paraplegia.
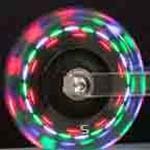
I wanted to be more visible at nighttime coming home from the transit station. I didn't want to use a bike light that hooked to my wheelchair, nor did I want to have a neon flag on the back of my wheelchair. So, after a lot of searching for something to make me more visible, we came across lighted casters (see photo right) and holographic spoke covers. It was the best investment we made! Now I am easily visible to cars and other pedestrians when crossing the street or wheeling on back roads that don't have sidewalks. That, and the lighted casters and spoke covers look cool on your ultra lightweight wheelchair and make it look less like a medical device. I hope this tip helps others who wheel at nighttime.
Cost:
-
The lighted casters are approximately $35.00 to $38.00 per pair.
-
The spoke covers are $125.00 for a pair.
Where to find:
-
Lighted casters: www.sportaid.com
-
Holographic spoke covers: www.coolhubcaps.com
How I Made a "Cushier" Shower Chair Cushion
Fall 2014
By Aditya Ganapathiraju
Aditya has C5 incomplete tetraplegia and is a member of the Northwest Regional Spinal Cord Injury System’s Consumer Advisory Board.
I have an incomplete SCI with partial sensation in my buttocks and found that the standard seat cushion that came with my travel shower commode chair was very hard and uncomfortable. I was unable to find a softer one that would fit the chair, so I decided to try to make my own.
I went to the Friendly Foam Shop in Seattle and bought a 18-inch square of a two-inch thick piece of Ensolite, which was their highest quality closed cell foam (closed cell foam is waterproof). 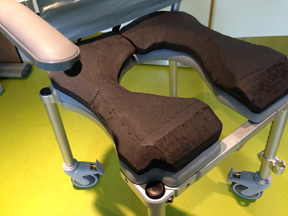
The shop employees cut the foam block into two halves that were the same size and shape as the existing cushions on the folding seat. (The Friendly Foam Shop is indeed friendly and has helped me with several projects.)
Securing the cushion to the chair was another challenge. I had been advised that most glues would not work well to secure foam to the synthetic seat cover and probably wouldn’t survive long under wet shower conditions. In order to keep the foam removable for stowing, I went to a hardware store to buy strips of industrial strength Velcro and used plastics glue to better adhere the self-adhesive strips to the seat and foam cushion.
After sitting on it for a test run, to test skin tolerance, etc., I thought it would be more comfy and safer for sitting and transferring if it had contours and beveled edges. I went back and had the foam shop bevel the inside edges, which was done with a motorized knife that worked like an electric turkey carver.
In the end (pun intended) everything worked like a charm! A comfy “tush cush”!
Stay Hydrated!
Spring 2014
Wheelchair users with SCI know they need to have water available at all times to keep hydrated, monitor liquid intake, and wash down medications on schedule. There are many different products on the market to meet your hydration needs. Most have been developed for cycling and can easily be found online or in bike stores and outdoor/sports retailers, like REI.
For this Tips column, three of our SCI Consumer Advisory Board members shared their hydration system preferences, based on many years of trial and error.
Bottles
There are so many different manufacturers, styles and prices! If you are buying a plastic water bottle, look for BPA-free products (to avoid any possible negative health effects from BPA leaching into your water) or stainless steel. Aditya Ganapathiraju (who has tetraplegia) likes the 24-ounce CamelBak Eddy Stainless Steel Water Bottle. “Unlike most plastic water bottles, it fits into bike cages because it’s tapered at the base.”
Mounting devices and cages
Bottle cages and cage mounts can come as a set or separately. Many of the systems are made for cycling and can be attached to tubing on the wheelchair’s frame or foot rest. They can be found in bicycle stores as well as online. There are many different styles, materials and features to choose from, depending on what is important to you—adjustability, bulkiness, weight, and ease of mounting and removal.
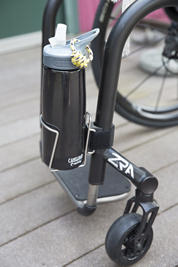 Julie Grant (who has paraplegia) prefers the Quick Caddy Stainless Steel Water Bottle Holder by Twofish, Unlimited (see photo on right). It consists of a simple metal cage with a Velcro mounting strap and is designed to fit wheelchairs, walkers, lawn chairs, and more.
“I’ve explored many a bike shop, and nothing has ever been better for me than this,” she says. “It’s incredibly light and comes off easily (in seconds). I remove it when flying, when spending time with small children (who like to fuss with the bottle) or if I’m in someone’s wedding photos. I’ve never experienced any rattling, wobbling or spilled drinks. They even make a cage sized for a pint glass!”

Aditya has tried many different bottle and cage systems. He has the Twofish set-up on his manual chair but finds that it loosens and rattles around too much on his power wheelchair.
For his power chair he uses a Topeak mount with a Profile Design Bottle Cage (see photo on left). It attaches firmly to the frame and can take a lot of abuse.
Water reservoir (bladder) systems
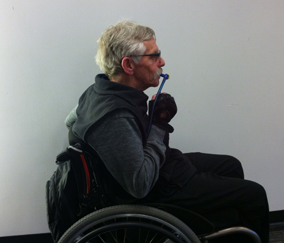
CamelBak pioneered the now-common hydration system consisting of a non-rigid reservoir bag (“bladder”) that is filled with water and placed inside a backpack-type carrier. Tubing connected to the reservoir bag ends in a bite-release mouth piece. Biting the valve opens the tube so the user can drink as if from a straw. The tube can be positioned so it is easy to grab. There is no need to pull out or open a bottle. There are many varieties, sizes and backpack styles to choose from.
CAB member Lan Remme, who has tetraplegia, finds CamelBak systems “very user friendly” (see photo below right). I have two different versions, one that has zipper pockets and doubles as a backpack. They are much easier for me than a water bottle.”
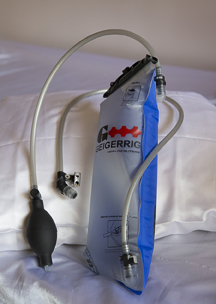
 Aditya uses the Geigerrig Pressurized Hydration Engine (a pressurized water reservoir system) when riding his handcycle (see photo below). “You pump it up so that when you bite the valve the water sprays into your mouth,” he says. “It is pretty effective and fun to use. Even if it runs out of pressure and you can’t pump it up yourself, it turns into a regular type of bladder system.”
Water reservoir systems can be found online or at outdoor and sporting goods stores such as REI.
Cleaning
Make sure you clean your bottle and all its parts regularly to avoid build-up of bacteria and other yucky stuff.
The CamelBak Bottle Brush Kit (S10.99) includes a large brush for cleaning the bottle and a little brush for scrubbing the small parts like straw, bite valve and cap.
Julie uses denture tablets: “I find that half of a tablet soaking in a bottle overnight gets the bottle squeaky clean with no scrubbing at all.”
Shoes & Pressure Ulcers
Fall 2013
Submitted by Aditya Ganapathiraju, a man with C5 incomplete tetraplegia and a member of the Northwest Regional Spinal Cord Injury System Consumer Advisory Board.
Problem
Finding shoes that protect your feet, keep you comfortable and meet your fashion standards.
Since my injury 12 years ago, I have been wearing oversized shoes because they are more comfortable, easier to put on, and provide room for swelling. Usually I purchase some kind of lightweight running or athletic shoe (I refuse to wear ugly comfort or orthotic shoes).
But the extra inch or two of shoe sticking out in front caused me to bump into things and made turning in small spaces difficult. And in spite of the extra room, I still occasionally developed serious skin breakdown on my heels. (Open-back shoes like clogs do not work for me because they slip off when I have leg spasms).
Solution
Relieve the pressure by modifying the heel of the shoe.
Since the backs of my shoes aren’t visible anyway, I decided to have a cobbler cut them off and replace them with a wide strip of elastic. This was better, but I still developed mild skin problems on my heels, especially when my ankles swelled up. I needed something more adjustable than the elastic.
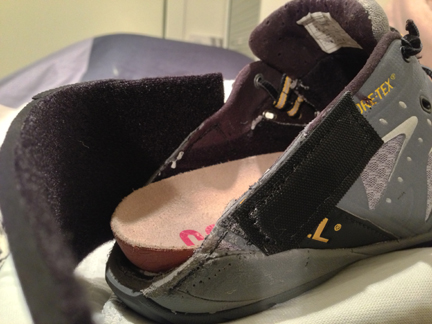
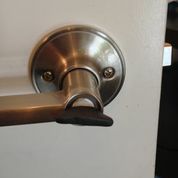
The answer was some inexpensive pieces of Velcro and stretchy neoprene. A cobbler attached Velcro strips to the exposed edges of the shoe heel (see photo on right). I cut a piece of neoprene to size and voila!—instant comfort and no more skin problems.
Where to get it
The Velcro and neoprene can easily be found at fabric and/or craft supply stores. I was able to buy enough for two pairs of shoes for under $20. A cobbler charges about $10 - $20 for cutting and/or sewing the Velcro strips onto the shoes.
Sugru: Modify/Adapt/Fix (Almost) Anything
Published Summer 2013
Submitted by Aditya Ganapathiraju, a man with C5 incomplete tetraplegia and a member of the Northwest Regional Spinal Cord Injury System Consumer Advisory Board.
What is Sugru?
Sugru is a moldable, silly-putty-like compound I use to make buttons and switches easier to grip on my camera, car, door locks and other equipment. Sugru dries overnight into a strong silicone rubber in any shape you need it. It bonds to most surfaces, including wood, plastics, most metals, glass, fabric and leather. It is waterproof, durable, removable, flexible when cured and stable at low and high temperatures (-50°C to +180°C).

What do you use it for?
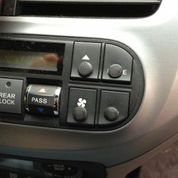
So many things! My first task was to make the buttons on my digital camera more tactile and easier to press with my nose or left index finger using only a small amount of force (left). Once I discovered Sugru, I figured out many other uses that improve functionality of my “stuff”: twisting my doorknob lock (below right); pressing the buttons on my car key remotes; pushing my phone charging cable into the phone; pressing the buttons inside my car that are a little tricky because they are flat and smooth (below left); reinforcing electrical cables that are separating from the body of the device; and so on.
Using Sugru
The friendly and helpful Sugru website (http://sugru.com) tells you all you need to know about using this product. Users share their ideas and photos online, and you can browse these different uses by category in their Guide (http:// sugru.com/guides). Directions, photos and videos provide instructions. You’ll be amazed at all the clever ideas and different uses—in the home, office, yard, car, boat, under water, in the wilderness, and much more.
Where to get it
You can buy it exclusively on the Sugru website at http:// sugru.com/us/buy. It comes in packets of different sizes and quantities. The smallest is three mini packs (5 grams each) for $10 (plus shipping). It is available in multi-color packs, black and white, or all black. Often one pack is more than enough for many small fixes. It’s a good idea to make a mental list of all the uses you might want at once because after you open a packet you only have about a half an hour or so before it starts to harden up. An unopened pack is good for six months if stored at room temperature or 18 months if refrigerated.
Advice
Go get some and let your Play-Doh-loving inner child out! (Note: Don’t eat it!)
Tips for Keeping Warm
Published Spring 2013
Submitted by Aditya Ganapathiraju, a man with C5 incomplete tetraplegia and a member of the Northwest Regional Spinal Cord Injury System Consumer Advisory Board.
Wool socks
Many people with SCI get cold feet of the literal kind by wearing cotton socks, which perform poorly in warmth, wicking, cushioning, and wear. I made the switch to wool and immediately noticed the difference in warmth, or rather, less pain in my feet from being cold. (I am an incomplete quad and have sensation in my feet and other places.) Whether you feel cold or not, letting your feet get cold is a good way to lose body warmth or even cause skin damage due to poor circulation. And having cold blood pool in your legs all day can send you from zero to freezing when you lie down in bed. A good pair of wool socks can be pricey, so be sure to check out closeout and clearance sales both in stores and online.
Where to get it
Soft, seamless, machine-washable wool socks by SmartWool and other brands are available in many styles, sizes and prices at retail stores and online, including REI, Sierra Trading Post and Amazon ($10–$25).
Leg warmers
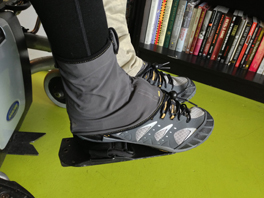
Figure 1. Black ankle-to-thigh cycling leg warmers and gray shoe gaiters are worn underneath pants for warmth.
Bicyclists use leg warmers when riding out in the cold, but on the legs of the well-prepared wheelchair user leg warmers can make a huge difference in staying warm and comfortable in cooler temperatures. After all, your legs are not moving around too much, and even with a thick pair of corduroys or denim pants, they can lose a lot of heat without another layer of insulating fabric. That’s where leg warmers are really handy (see Figure 1). They only go up to about mid-thigh, which is ideal for the roller who doesn’t want to sit on another layer of fabric, which can wrinkle and cause skin problems. I’ve noticed a huge difference in overall warmth when wearing let warmers, and even though I don’t actually feel coldness in my legs, the pain caused by cold is significantly lower, especially when I’ve been rolling around town in frosty weather. I have two different kinds I bought online at REI closeout sales, one made of synthetic stretchy spandex (Perl Izumi) and another of fancy wool (Ibex); both zip at the ankles for easy on-off. Cyclists wear their leg warmers tight, but you should order them a size or two larger so they are easier to get on and don’t constrict your flesh. Even though leg warmers stop at the ankles, they also help to keep my feet warmer. And since they’re so formfitting, you can still wear discreet accessories under your pants (e.g., your leg bag,).
Where to get it
REI, Amazon and other retailers ($30 and up).
Shoe gaiters
Winter gaiters are generally used by hikers and skiers for sealing the space between your pants and shoes in the vulnerable ankle/sock area, where Old Man Winter often sends his cold breath to rob you of your heat. Gaiters used by runners are shorter, lightweight versions that usually forgo the straps and bulkiness associated with full-size (see Figure 1). In addition to sealing out the elements, they also resemble old timey spats—a once popular footwear accessory—and make a nice fashion statement.
Where to find:
Mountain Hardware Strapless Running Gaiters, sold on Amazon ($23.97 - $39.95 ).