

Spinal Cord Injury Model Systems Consumer Information
Skin Care & Pressure Sores
Skin Care & Pressure Sores
• Part 1: Causes & Risks of Pressure Sores
• Part 2: Preventing Pressure Sores
• Part 3: Recognizing & Treating Pressure Sores
How to do pressure reliefs (weight shifts)
[Click here for a printer-friendly version of this page.]
The pressure relief technique you use will depend on your level of injury, the type of wheelchair you use and how much movement and strength you have in your arms and shoulders.
- Tilting or reclining in a power wheelchair
- Leaning from side-to-side
- Leaning forward
- Independent push-ups
- Progression of training
- Alternate techniques
- References
- Copyright and source information
Tilting or reclining
If you are unable to perform independent pressure reliefs, you can use a power tilt wheelchair for regular pressure relief.
Tilt, recline and elevating leg rests are features that can be used to change body position in a manner that provides pressure relief.
It is very important that you receive training from your health care provider in how to use any of these features in order to make sure you are getting enough pressure relief. Improper use of these features can also lead to injury.
Note that tilt and recline features provide the most pressure relief when used in combination. (RESNA, 2008)
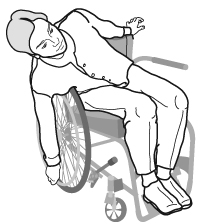
Tilt systems maintain the seat to back angle but change the angle orientation to the ground. Tilt angle of between 25 and 65 degrees has been shown to provide pressure relief, but 15 degrees or less does not provide adequate pressure relief. Figure 1 shows a 65 degree tilt.
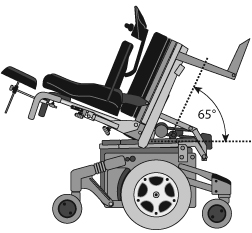
Figure 1: Tilt System
Recline systems (Figure 2) provide a change in seat-to-back angle while maintaining a constant seat angle with respect to the ground. The use of recline affects the vertical (downward) pressure and horizontal pressure on your skin and needs to be evaluated individually.
Elevating leg rests allow change in the angle of legs and/or footrests in relation to the seat, extending the knee. This feature can help reduce pressure when using the recline feature.
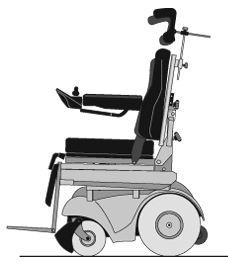
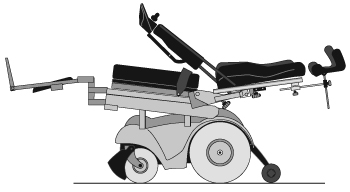
Figure 2: Recline System
Leaning from side to side
This technique relieves pressure over one buttock at a time.
1. Lock your wheels, and swing away one armrest from your wheelchair.
2. Hold onto the remaining armrest and lean your body to the opposite side, taking the weight off one buttock for 30-90 seconds (Figure 3).
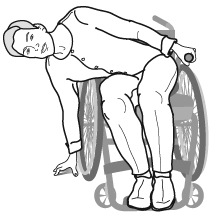
Figure 3
If you cannot grasp the armrest with your hand, you may be able to hook your wrist behind the wheelchair push handle or back rest (Figure 4).
To regain the upright position, you may need to use the wheelchair push handle or armrest for assistance. Some also find that pushing up on the push rims of the wheels helps in regaining upright position
You may use a table or other stationary object to lean against for assistance (Figure 5). Just be sure the weight is completely off the opposite buttock, and hold the position for 30-90 seconds.
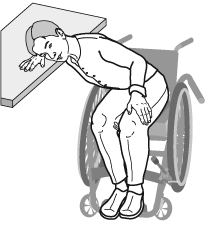
Figure 5
3. Repeat on the other side.
Leaning forward
This technique can be done independently or with assistance.
- Move your wheelchair so that the front casters are turned forward, then lock the wheels of your wheelchair.
- Bend forward and bring your chest to your knees (Figure 6). This lifts the weight of your bottom from the wheelchair. Stay in this position for 30-90 seconds.
-
Return your body to the upright position. There are several techniques to regain upright position depending on your equipment and the strength in your arms and trunk. You may:
- Place your hand on your knees and push up.
- Keep your hand on push handles and pull up.
- Place your hand against the front of the armrest and push up
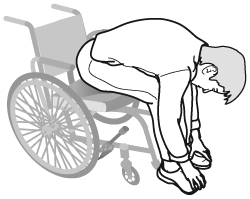
Figure 6
Independent push-ups
This technique can be used by individuals who can extend their elbows and lift their body weight (people with an injury at C7 and below). Grip your arm rests with your hands and lift up completely off your seat for 30-90 seconds. Since this method could harm the rotator cuff (part of the shoulder joint), it should only be used if you are unable to complete the other techniques.
Progression of Training
Early in your training, you may find that it is difficult to shift your weight away from the center of your chair. It may also be difficult for you to regain upright position after shifting your weight. You may try the following techniques:
- Position and lock your chair next to a stationary object. Perform the side lean as instructed above, but use the object to push up as you regain the upright position.
- Position and lock your chair in front of a table. Lean forward onto the table and use it to push back up.
Alternate Techniques
If you are looking for less obvious pressure relief techniques when you are out in the community, the following suggestions can be done without attracting attention.
Cross one leg over the other and lean back to one side while holding your knee in position, lifting the weight off one buttock (Figure 7). Repeat using the other leg.
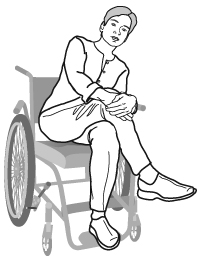
Figure 7
Cross your leg by putting one ankle over the other knee and lean forward, lifting the weight off your buttock (Figure 8). Repeat using the other leg.

Figure 8
Spend some time “fixing” your shoe laces, your feet, or the hem of your pants to achieve the same position as the forward lean technique in Figure 6, above.
Lean against tables as you speak to others.
References
-
Resna Position on the Application of Tilt, Recline and Elevating Legrests, Rehabilitation Engineering & Assistive Technology Society of North America. Arlington, VA. April 2008.
[Return to Part 2: Preventing Pressure Sores]
Copyright and source information
©2009 Model Systems Knowledge Translation Center (MSKTC). This publication was produced by the SCI Model Systems in collaboration with the Model Systems Knowledge Translation Center (http://msktc. washington.edu) with funding from the National Institute on Disability and Rehabilitation Research in the U.S. Department of Education, grant no. H133A060070.
Our health information content is based on research evidence and/or professional consensus and has been reviewed and approved by an editorial team of experts from the SCI Model Systems.